
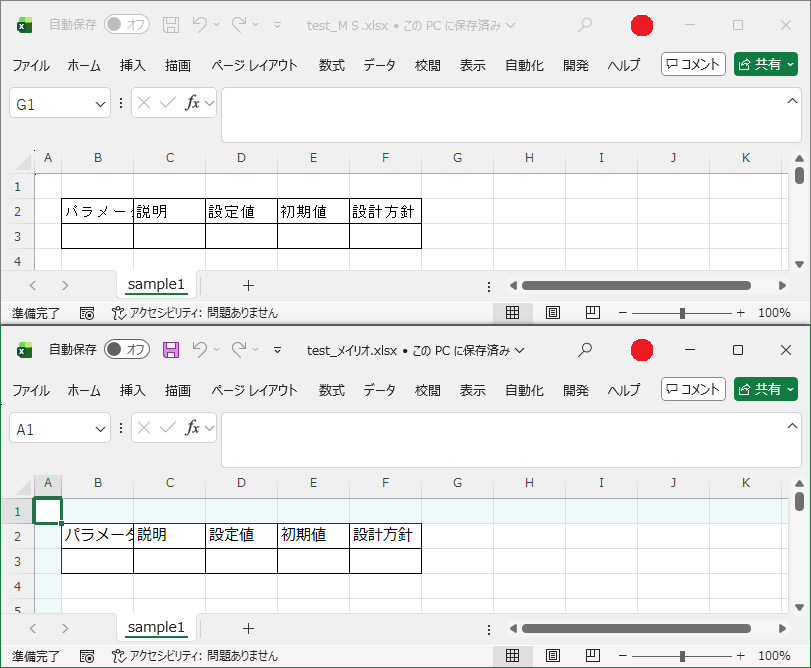
前回はExcelのファイルを作成かつ列数を指定して表が表れて入力した情報がExcelのファイルを作成するだけでなく、今回は不要な項目を削除し、フォントを指定し罫線を引くところまでを修正したいと思います。
<html>
<head>
<meta charset="UTF-8">

<HTA:APPLICATION
    ID="HTAExcelTool"
    BORDER="dialog"
    CAPTION="yes"
    SCROLL="no"
/>

<title>Excel 可変列入力ツール</title>

<style>
body {
    font-family: Meiryo;
}

select{
    width:120px;
    height:24px;
    font-size:14px;
    color: WindowText;
    background-color: Window;
}

option{
    color: WindowText;
    background-color: Window;
}

/* 基本情報の入力欄 */
#txtFolder, #txtFile, #txtSheet {
    width:200px;
}

/* 開始列と開始行だけ幅を半分に */
#txtStartCol, #txtStartRow {
    width:100px;
}

/* Excel列用入力欄 */
#inputArea input {
    width:165px;
}

table{
    border-collapse: collapse;
    margin-top: 10px;
    border: 1px solid black;
}

td{
    padding: 4px 10px;
    border: 1px solid black;
    text-align:center;
}
</style>
<script language="VBScript">

Dim maxCols
maxCols = 10

' 初期化 Sub
Sub Init()
    Dim i, opt

    ' 列数プルダウン初期化
    Do While colSelect.options.length > 0
        colSelect.remove 0
    Loop

    For i = 1 To maxCols
        Set opt = document.createElement("OPTION")
        opt.innerText = i & " 列"
        opt.value = i
        colSelect.appendChild opt
    Next

    colSelect.value = 3

    UpdateInputs
End Sub

' Excel列入力欄描画
Sub UpdateInputs()
    Dim cols, i, html
    cols = CLng(colSelect.value)

    html = "<table><tr>"

    ' 見出し
    For i = 1 To cols
        html = html & "<td>項目" & i & "</td>"
    Next

    html = html & "</tr><tr>"

    ' 入力欄
    For i = 1 To cols
        html = html & "<td><input type='text' id='txt" & i & "'></td>"
    Next

    html = html & "</tr></table>"

    inputArea.innerHTML = html
End Sub

' Excel作成 Sub
Sub CreateExcel()
    Dim saveFolder, fileName, sheetName, fullPath
    Dim xl, wb, i, cols
    Dim startCol, startRow

    ' 基本情報取得
    saveFolder = Trim(txtFolder.value)
    fileName   = Trim(txtFile.value)
    sheetName  = Trim(txtSheet.value)
    startCol   = CLng(Trim(txtStartCol.value))
    startRow   = CLng(Trim(txtStartRow.value))

    If saveFolder = "" Or fileName = "" Or sheetName = "" Then
        MsgBox "格納先・ファイル名・シート名をすべて入力してください。", 48, "未入力"
        Exit Sub
    End If

    ' 拡張子補正
    If LCase(Right(fileName, 5)) <> ".xlsx" Then
        fileName = fileName & ".xlsx"
    End If

    fullPath = saveFolder & "\" & fileName

    ' Excel操作
    cols = CLng(colSelect.value)

    ' Excel起動・Workbook作成
    Set xl = CreateObject("Excel.Application")
    xl.Visible = False
    xl.DisplayAlerts = False
    Set wb = xl.Workbooks.Add()

    ' シート名変更
    wb.Sheets(1).Name = sheetName


    ' データ
    For i = 1 To cols
        wb.Sheets(1).Cells(startRow, startCol + i - 1).Value = document.getElementById("txt" & i).value
    Next

    ' 罫線行数取得
    Dim borderRows
    borderRows = CLng(Trim(txtBorderRows.value))
    If borderRows < 1 Then borderRows = 1

    ' 罫線追加(項目行 + 指定行数)
    Dim lastCol, lastRow

    lastCol = startCol + cols - 1
    lastRow = startRow + borderRows

    With wb.Sheets(1).Range( _
            wb.Sheets(1).Cells(startRow, startCol), _
            wb.Sheets(1).Cells(lastRow, lastCol) _
         )

        ' 罫線
        .Borders.LineStyle = 1
        .Borders.Weight = 2

        ' フォント指定
        .Font.Name = fontSelect.value

    End With


    ' 列幅調整(開始列が1の場合)
    If startCol <> 1 Then
        MsgBox "開始列が1ではないので1列目の幅を半分にします"
        wb.Sheets(1).Columns(1).ColumnWidth = wb.Sheets(1).Columns(1).ColumnWidth / 3
    End If

    ' 保存・終了
    wb.SaveAs fullPath
    wb.Close
    xl.Quit

    Set wb = Nothing
    Set xl = Nothing

    MsgBox "Excel 作成完了" & vbCrLf & fullPath

End Sub

</script>
</head>

<body onload="Call Init">

<h3>Excel 作成ツール</h3>

<p style="font-weight:bold;color:blue;">
保存情報および開始位置・罫線設定を入力してください。
</p>

<table>
<tr>
    <td>格納先</td>
    <td>ファイル名</td>
    <td>初回シート名</td>
    <td>開始列</td>
    <td>開始行</td>
</tr>
<tr>
    <td><input id="txtFolder" type="text"></td>
    <td><input id="txtFile" type="text" value="sample.xlsx"></td>
    <td><input id="txtSheet" type="text" value="Sheet1"></td>
    <td><input id="txtStartCol" type="text" value="2"></td>
    <td><input id="txtStartRow" type="text" value="2"></td>
</tr>
</table>

<br>

<p style="font-weight:bold;color:blue;">
作成する列数と、各列の入力値を指定してください。
</p>

列数:
<select id="colSelect" onchange="UpdateInputs()"></select>

<div id="inputArea"></div>

<br>

<table>
    <tr>
        <td>罫線行数</td>
        <td>フォント</td>
    </tr>
    <tr>
        <td>
            <input id="txtBorderRows" type="text" value="1">
        </td>
        <td>
            <select id="fontSelect">
                <option value="MS ゴシック">MS ゴシック</option>
                <option value="メイリオ">メイリオ</option>
                <option value="Arial">Arial</option>
            </select>
        </td>
    </tr>
</table>

<button onclick="CreateExcel()">Excel作成</button>

</body>
</html>